English
Appearance
Most code examples have a bar under them:
console.log prints.Ctrl+Enter).Try it:
const course = "Practical JavaScript Basics";
console.log("Welcome to", course);In every runnable example, the variable doc holds the example JSON document, like the doc a check rule receives:
console.log(doc.overview.model);
console.log(doc.inventory.details.firmware_level);The example JSON document is made up
All names and values in it are invented; only the shape is typical of the JSON a device sends.
The whole document, with a map of its parts and tips on how to print it: The example JSON document. There, a click on a file name opens the file in a viewer: as a tree, as a list of all paths and values, or as tables. A click on a value shows the path to it, the way your code reads it.
The practice tasks and the homework are in the Homework repository: https://github.com/ivapopova-courses/JS-Basics-Practical-IBM-Homework
Each lecture has a folder there (02-variables-and-types/, ...) with two kinds of tasks:
practice/task1-....js, ...): short exercises, one topic each, in the order of the lecture. We start them in class. Finish the rest at home if you can - later tasks and the course project reuse them.homework.js): one larger task that puts the topics of the lecture together, on data shaped like real reports. Do it before the next session - we go through it together at the start.You do this only once, at the start of the course. It takes about 15 minutes. If you already did it in session 1, go to step 6 and check that everything is right.
The idea. A repository (or repo) is a project folder whose history Git keeps. In this course you work with three copies of the Homework repository:
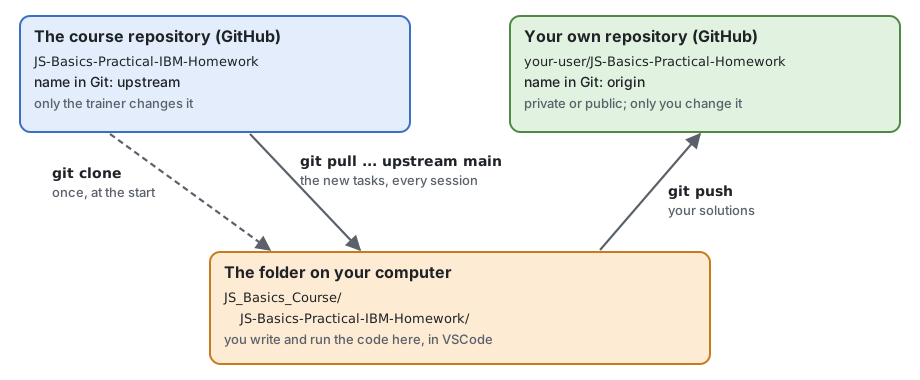
upstream is the course repository. Everybody can read it, but only the trainer can change it. You only pull from it - this is how you get the new tasks.origin is your own repository. You push your solutions to it, so they are saved online and you can open them from any computer.upstream and origin are only short names for the two web addresses (Git calls them remotes), so that you do not have to type the full address every time.
You need a GitHub account (https://github.com/signup), and Git, Node.js and VSCode installed (see lecture 1, section 2). Open VSCode, then Terminal > New Terminal, and type:
git -v       # git version 2.x.x
node -v      # v24.x.x
If one of them says command not found or is not recognized, install that tool, then close and open VSCode again.
Git writes your name and email into every commit (every saved version). Skip this step if you did it in session 1: git config user.name then prints your name.
git config --global user.name "Your Name"
git config --global user.email "you@example.com"
Use the same email as in your GitHub account.
Sign in to https://github.com.
Click + (top right), then New repository.
Repository name: for example JS-Basics-Practical-Homework.
Choose Private (only you can see it) or Public.
Leave everything else as it is: no README, no .gitignore, no licence. The repository must be empty - otherwise step 5 fails.
Click Create repository.
GitHub shows a page with a web address like https://github.com/your-user/JS-Basics-Practical-Homework.git. Copy it (the copy button next to it). You need it in step 4.
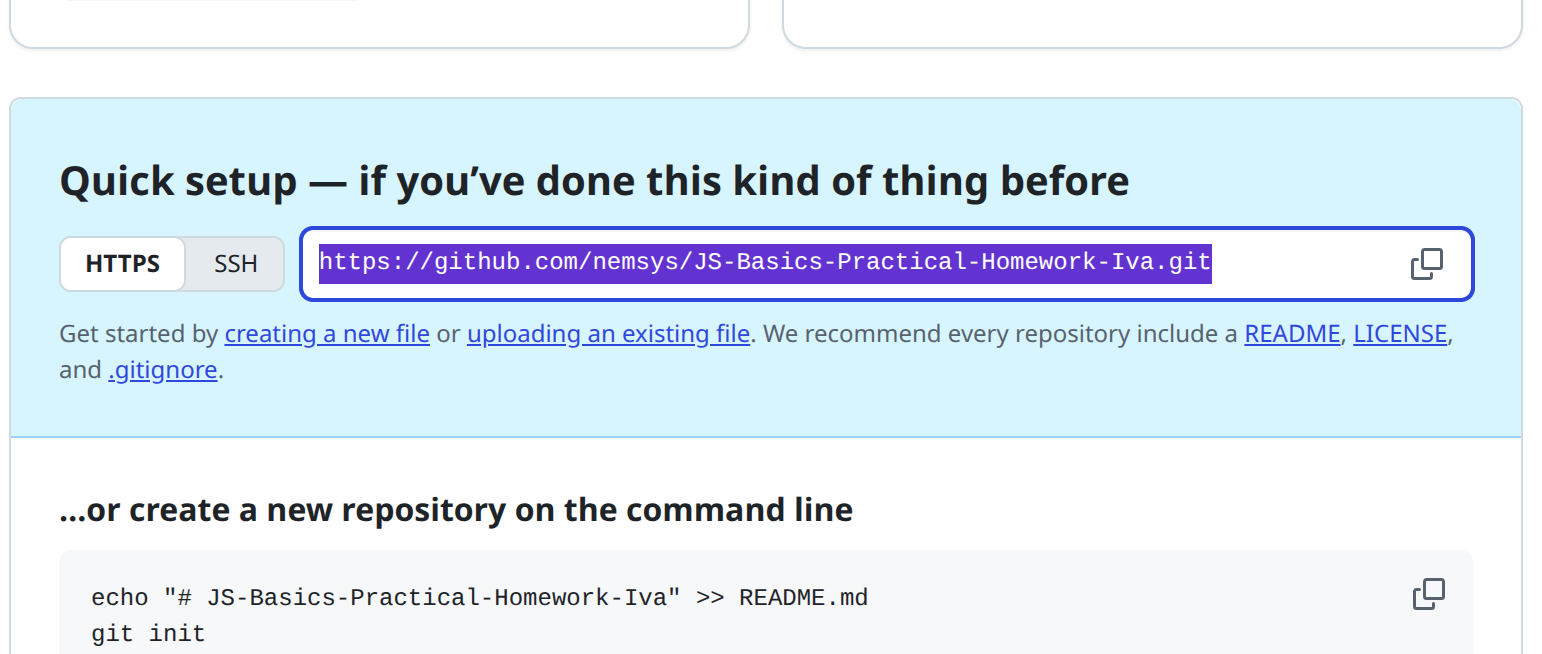
In VSCode, open the folder where you keep the course (File > Open Folder, for example JS_Basics_Course), then open a terminal (Terminal > New Terminal). Type the commands below one at a time and press Enter after each.
Download the course repository (this creates the folder JS-Basics-Practical-IBM-Homework):
git clone https://github.com/ivapopova-courses/JS-Basics-Practical-IBM-Homework.gitGo into the new folder - all the next commands must run there:
cd JS-Basics-Practical-IBM-HomeworkAfter a clone, Git names the repository you cloned from origin. Rename it to upstream, because it is the course repository, not yours:
git remote rename origin upstreamAdd your own repository as origin. Paste your address from step 3 instead of the example one:
git remote add origin https://github.com/your-user/JS-Basics-Practical-Homework.gitPaste in the terminal
In the VSCode terminal, paste with Ctrl+V (or right-click). In other terminals on Linux, use Ctrl+Shift+V.
git push -u origin mainThis copies the files to your repository on GitHub. -u origin main makes Git remember the place: from now on a plain git push is enough.
The first time, GitHub asks you to sign in:
Still in the JS-Basics-Practical-IBM-Homework folder:
git remote -vYou should see four lines like these - origin with your address, upstream with the course address:
origin    https://github.com/your-user/JS-Basics-Practical-Homework.git (fetch)
origin    https://github.com/your-user/JS-Basics-Practical-Homework.git (push)
upstream  https://github.com/ivapopova-courses/JS-Basics-Practical-IBM-Homework.git (fetch)
upstream  https://github.com/ivapopova-courses/JS-Basics-Practical-IBM-Homework.git (push)
Also open your repository on GitHub (refresh the page): you should see the lecture folders there.
File > Open Folder and choose JS-Basics-Practical-IBM-Homework (the folder itself, not the folder above it). Always open this folder when you work on the tasks: then the terminal starts in the right place. If VSCode offers to install the recommended extensions (bottom right), click Install - see VSCode extensions.
Something went wrong? Find the message in If something goes wrong.
JavaScript support is built into VSCode: nothing else is needed for the first sessions. Two extensions help from lecture 10 on:
| Extension | By | What for | Needed |
|---|---|---|---|
| ESLint | Microsoft | shows the problems the linter finds, as you type | lecture 10 |
| Prettier - Code formatter | Prettier | formats a file the same way every time | lecture 10 |
Install them at once. The Homework folder has the list of recommended extensions in .vscode/extensions.json: when you open the folder, VSCode asks Do you want to install the recommended extensions...? - click Install. Missed the question? Open the Extensions view (Ctrl+Shift+X) and type @recommended in the search box. Under Workspace Recommendations, hover over the header and click the cloud icon (Install Workspace Recommended Extensions).
For another folder: download the list, extensions.json, and put it into a folder .vscode in that folder (the file must be .vscode/extensions.json). Or create the file yourself with this content:
{
  "recommendations": [
    "dbaeumer.vscode-eslint",
    "esbenp.prettier-vscode"
  ]
}
On a company laptop
Some companies block the extension Marketplace or allow only approved extensions. If Install does not work, ask your IT for the extensions in the table.
Open the Homework folder in VSCode (File > Open Recent) and a terminal (Ctrl+`). The terminal starts in the repository root.
In the Explorer, open the file of the task, for example 05-functions/practice/task2-versions.js.
Read the file from the top. From session 5 on, a task is split into parts. Each part starts with a line // =====... and a heading (// == Part 1: ... ==), then its description, the // ---- your code ... ---- lines, and right after them its checks. Write your code between // ---- your code ... ---- and // ---- end of your code ----, and change nothing else in the file.
Save the file (Ctrl+S) and run it from the repository root:
node 05-functions/practice/task2-versions.jsYou do not have to type the path: right-click the file in the Explorer > Copy Relative Path, then type node in the terminal (with a space) and paste.
Or let Node run the file again every time you save it. Keep this terminal open next to the editor, and stop it with Ctrl+C when you go to another file:
node --watch 05-functions/practice/task2-versions.jsWhile some checks are not OK, Node adds the line Failed running ... Waiting for file changes. That is normal: it only means "not all checks passed yet".
Read the result. A line -- Part N: ... --- starts the checks of each part. Each check prints OK (green), FAIL (red), or TODO (yellow: you have not written any code in this part yet). Under a FAIL line you see what your code gave (got:) and what the check expects (expected:). At the end you see one line per part and a line like 5 of 18 checks passed. Fix your code and run the file again.
Then go on with the next part: it starts right after the checks of this one.
Predict tasks
In a predict task (task1-predict.js) you do not write code. You replace each TODO with what you think the expression gives, for example "local", 3 or undefined. The file prints OK, WRONG or TODO (not answered yet) for each prediction, but never the real result, so run it as often as you like. At the end, each part that is not all OK yet shows links to the lecture sections that explain it. For a WRONG, read the section again and change your prediction. Still WRONG after that? Write to the trainer, and we will discuss it in class.
Save your solutions in your own repository at the end of each working day, and always before a session. Three commands, in the terminal of the Homework folder:
git add .
git commit -m "Session 5 practice"
git push
git add . chooses all changed files (mind the dot), git commit saves a version on your computer with a short message, git push sends it to your repository on GitHub. If git commit says nothing to commit, working tree clean, there is nothing new to save: did you save the file (Ctrl+S)?
The trainer adds the folder of each lecture on the morning of its session. To get it:
Save your work first: the three commands of Save your work.
Get the new tasks from the course repository:
git pull --no-rebase --no-edit upstream mainSend them to your own repository too:
git pushYou see: after the pull, a line like Merge made by the 'ort' strategy. (or Fast-forward) and the list of the new files. The new lecture folder appears in the Explorer. Your own files do not change: published task files are never changed, so there are no conflicts.
The parts of the pull command: upstream main - from the course repository; --no-rebase - join the new tasks with your own commits; --no-edit - do not ask for a message. Without them, Git stops with an error or opens an editor.
Read the last lines in the terminal: the error is usually there. Find it below. Still stuck? Write to the trainer: the step, the command, and a screenshot of the terminal.
... is not recognized as an internal or external command or command not found (git, node) - the tool is not installed, or VSCode was open while you installed it. Install it (see lecture 1, section 2), then close VSCode completely and start it again.npm : File ... npm.ps1 cannot be loaded because running scripts is disabled on this system - the terminal is PowerShell, and the company settings block its scripts. Type npm.cmd instead of npm, or switch the terminal to the Command Prompt: Ctrl+Shift+P, Terminal: Select Default Profile, Command Prompt, then open a new terminal.Error: Cannot find module '...task2-versions.js' - the path of the file is wrong for the folder the terminal is in. Run the command in the repository root (the prompt ends with JS-Basics-Practical-IBM-Homework), or copy the path with Copy Relative Path.fatal: destination path 'JS-Basics-Practical-IBM-Homework' already exists - you cloned it before. Run cd JS-Basics-Practical-IBM-Homework and continue with git remote -v (step 6) to see what is still missing.fatal: not a git repository - the terminal is not in the repository folder. Run cd JS-Basics-Practical-IBM-Homework, or open that folder in VSCode (step 7) and open a new terminal.error: remote origin already exists - you already added origin. If its address is wrong (check with git remote -v), fix it: git remote set-url origin https://github.com/your-user/your-repo.giterror: remote upstream already exists or No such remote 'origin' after git remote rename - the rename is already done. Continue with the next command.! [rejected] ... (fetch first) on the first push - your GitHub repository is not empty (it was created with a README). The easiest fix: delete that repository on GitHub (Settings, at the bottom: Delete this repository), create it again without a README (step 3) and run git push -u origin main again.remote: Repository not found. - the address has a typo (check it with git remote -v), or Git is signed in with another GitHub account. On Windows, open Credential Manager from the Start menu > Windows Credentials, remove the entry git:https://github.com, and run the command again: Git asks you to sign in.Password authentication is not supported - you typed your GitHub password. Use a personal access token instead (step 5).Author identity unknown (commit) - Git does not know who you are. Do step 2, then run the commit again.fatal: Need to specify how to reconcile divergent branches. (pull) - the two options are missing. Use the whole command of Get the new tasks.Your local changes to the following files would be overwritten by merge (pull) - some changes are not saved in a version yet. Do the three commands of Save your work, then pull again.CONFLICT (pull) - rare: the same file was changed in both repositories. Run git merge --abort (everything is as before the pull) and write to the trainer.~, or -- INSERT -- at the bottom) - Git asks for a message in the editor Vim. Press Esc, type :wq and press Enter. Next time, use the commands exactly as on this page (git commit -m "...", git pull --no-rebase --no-edit ...).The code written during the lessons is in the Labs repository: https://github.com/ivapopova-courses/JS-Basics-Practical-IBM-Labs
Clone it once, and after each lesson run git pull in it to get the new code. Do not write your own code there - use the Homework repository for that.
git clone https://github.com/ivapopova-courses/JS-Basics-Practical-IBM-Labs.git
cd JS-Basics-Practical-IBM-Labs
git pull # after each lessonSome sections have an Animation box with links. Each link opens a step-by-step animation in a new tab: it shows what JavaScript does under the hood (memory, the order of calculation, the path through a loop). Use the Right / Left arrow keys to step forward and back. All animations, by session: Animations.
Ctrl+K) searches all lectures.