English
Appearance
Today you will learn to:
git init, add, commit, status, log, .gitignore, remote, push, clone, pull;Where this course is going - by the end you read and write check rules like this one with ease. Today you only need to recognise the parts:
const MODELS = ["XR-210", "XR-220"];           // data the rule needs

function rule(doc) {                           // the engine calls this for every report
    const model = doc.overview.model;          // read a value from the report
    if (!MODELS.includes(model)) return;       // not our model: stop

    emit(doc.status.device_alias, {            // create an alert
        "Model": model,
        "Version": doc.overview.version
    });
}
doc is the report of one device - a JSON document.rule(doc) is a check rule: a function that looks at the report and decides.emit(...) creates an alert when the check finds a problem.Every lecture adds the pieces you need to write more of this.
Iva Popova - LinkedIn
Teaching experience
Professional experience
Education
A deep, solid knowledge of the basics of JavaScript. Not only what to write, but also how and why the code works - so that you read and write JavaScript with ease and confidence, in any project:
Applied to your work: read and write check rules over large, deeply nested JSON documents with confidence, and build, test and document a small helper library for the JSON of one product. The focus is where your work needs it most: functions, arrays, objects, methods and properties.
10 sessions of 4 academic hours. The full plan is on the Agenda page:
| Session | Topic |
|---|---|
| 1 | Getting started (today) |
| 2 - 3 | Variables, types, operators; conditions and loops |
| 4 | Arrays and lists of records |
| 5 | Functions, and reading older code |
| 6 | Objects: deep paths, dictionaries, data shapes |
| 7 | Array methods: transforming, grouping and indexing data; project kickoff |
| 8 | Strings, regular expressions, dates and numbers |
| 9 | JSON, Node.js, modules and errors; running rules locally |
| 10 | Tests, JSDoc types and code quality; Git workflow; project review |
Every example is shown on the kind of data you work with: the JSON report of one device (doc) and a check rule. The reports in this course are made up - the names and values are invented, the shapes are realistic.
OK or FAIL, and a short homework. The homework is reviewed at the start of the next session.| What | Where |
|---|---|
| The lectures (this site) | https://ivapopova-courses.github.io/JS-Basics-Practical-IBM-Slides/ |
| Practice tasks and homework | https://github.com/ivapopova-courses/JS-Basics-Practical-IBM-Homework |
| The code written in class | https://github.com/ivapopova-courses/JS-Basics-Practical-IBM-Labs |
| Step-by-step animations | Animations |
| The course project | Course project |
A small helper library for the JSON of one product, which makes it simpler and safer to read properties in check rules. It grows during the course - the first function comes in session 5 - and is presented in session 10. Start thinking now: which product, which reports, which lines do you write again and again in your rules?
You need four things. Install them before session 2.
| Tool | What for | Get it | Check it |
|---|---|---|---|
| Node.js (the LTS version) | runs JavaScript files on your computer | https://nodejs.org | node -v |
| VSCode | the editor we use in the course | https://code.visualstudio.com | open it |
| Git | version control: saves the history of your files | https://git-scm.com/downloads | git -v |
| A GitHub account | hosts your repositories online | https://github.com | sign in |
Check the installations in a terminal (on Windows: PowerShell or Command Prompt; in VSCode: Terminal > New Terminal):
node -v      # v24.x.x (any current LTS version works)
npm -v       # npm comes with Node.js
git -v       # git version 2.x.x
Node.js LTS
Install the LTS ("long-term support") version of Node.js - it is the stable one. This course is tested with Node.js 24.
Keep the course in one folder, for example JS_Basics_Course/. Inside it, the repositories you clone in this session (section 4) and a folder for your own experiments:
JS_Basics_Course/
|-- JS-Basics-Practical-IBM-Homework/   # practice tasks and homework (section 4)
|-- JS-Basics-Practical-IBM-Labs/       # the code written in class
`-- playground/ # your own experimentsNames that work everywhere save you trouble later - on servers, in Git, in the terminal:
- and _;-, _ or camelCase (versionCheck.js);Rule.js and rule.js as two different files - Windows does not.A text editor edits text files and highlights the syntax. An IDE (Integrated Development Environment) adds tools: running and debugging, testing, refactoring, version control, project-wide search and navigation.
| Examples | |
|---|---|
| Text editors | Notepad++ (Windows), Sublime Text, Visual Studio Code |
| IDEs | WebStorm, IntelliJ IDEA, Eclipse, NetBeans, Visual Studio |
VSCode sits in the middle: a light editor that becomes an IDE with extensions. It is free and open-source, runs on Linux, Windows and macOS, has excellent JavaScript support out of the box, a built-in terminal, a debugger and Git integration, and a huge extensions marketplace. We use it in the course; what matters most is that you learn your editor well.
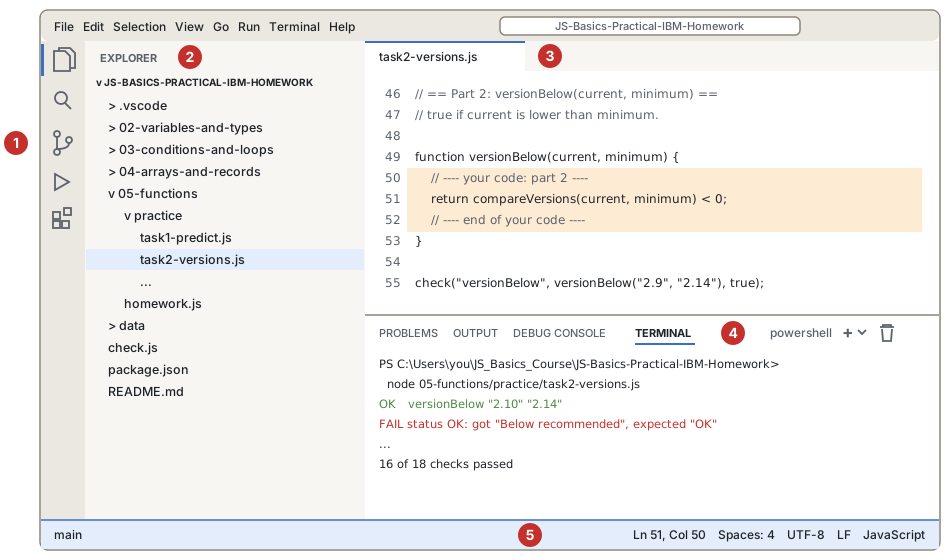
Ctrl+\.Ctrl+`), Problems, Output.See User Interface in the VSCode docs.
Ctrl+Shift+P (macOS: Cmd+Shift+P) opens the Command Palette: every command of VSCode and its extensions, with search by any part of the name. If you do not know the shortcut for something, type its name there - "toggle terminal", "format document", "change language mode". Ctrl+P opens a file by name.
| Shortcut (Windows / Linux) | Does |
|---|---|
Ctrl+Shift+P | Command Palette |
Ctrl+P | open a file by name |
Ctrl+` | show / hide the terminal |
Ctrl+/ | comment / uncomment the line |
Alt+Up / Alt+Down | move the line up / down |
Shift+Alt+Down | copy the line down |
Ctrl+D | select the next match of the selected word |
F2 | rename a variable everywhere |
Shift+Alt+F | format the document |
On macOS use Cmd instead of Ctrl and Option instead of Alt. The full lists: keyboard reference sheets.
The Extensions view (Ctrl+Shift+X) installs extensions from the marketplace. For the first sessions nothing extra is required - JavaScript support is built in. From lecture 10 on, ESLint and Prettier help; the Homework folder recommends them, and VSCode offers to install them when you open it (see VSCode extensions). Change the color theme with File > Preferences > Theme > Color Theme, or "color theme" in the Command Palette.
Git is the tool; GitHub is one place to keep and share what Git records. Rules, like any code, are best kept in Git: every change has a history and a reason.
| Kind | Where the history is | Example |
|---|---|---|
| local | only on your computer | old tools, rarely used today |
| centralized | on one server; everyone works against it | Subversion (SVN) |
| distributed | every copy has the full history; servers are for sharing | Git |
Tell Git your name and email - they are stored in every commit. Use the email of your GitHub account, so that GitHub shows the commits as yours:
git config --global user.name "Your Name"
git config --global user.email "you@example.com"

# check
git config user.name
git config user.email

# optional: use VSCode to write longer commit messages
git config --global core.editor "code --wait"
Without --global, the setting applies only to the repository you are in.
git init cd playground
git init # creates a hidden .git folder: Git now tracks this foldergit add / git commit A change goes through three areas:
git add puts the change into the next commit. You choose what goes in.git commit saves the staged changes as a snapshot.git add hello.js # stage one file
git add . # stage all changes in this folder and below
git add -A # stage all changes in the repository, also deletions
git commit -m "Add the first script"
git restore --staged hello.js # unstage (the change stays in the file)Older Git versions suggest git reset HEAD -- <file> to unstage - it does the same.
git status, git diff).| Good | Not helpful |
|---|---|
Fix the version comparison for "4.10" | changes |
Add the firmware check for XR-220 | update rule |
git status and git log git status shows where every change is: modified but not staged, staged, or untracked (new files Git does not know yet). It also says what to do next:
On branch main
Changes not staged for commit:
  (use "git add <file>..." to update what will be committed)
        modified:   hello.js

Untracked files:
  (use "git add <file>..." to include in what will be committed)
        notes.txt
git log shows the history, newest first: the commit id (hash), the author, the date and the message. git log --oneline gives one line per commit.
.gitignore A file named .gitignore in the root of the repository lists the files Git should not track - generated files, logs, local settings, passwords and keys:
# dependencies installed by npm
node_modules/
# all log files, except one
*.log
!important.log
# a local configuration with secrets
/config/local.json
GitHub keeps ready-made .gitignore templates for many languages; the Node.gitignore one fits JavaScript projects.
.gitignore - they would clash with your local history).git remote add origin https://github.com/<your-user>/<your-repo>.git
git push -u origin main # the first time: -u remembers where to push
git push # every time after thatSigning in. VSCode signs you in to GitHub with your account, in the browser. On the command line, GitHub does not accept your password: it asks for a personal access token (GitHub > Settings > Developer settings > Personal access tokens) or uses SSH keys. Keep tokens secret, like passwords.
git clone git clone https://github.com/ivapopova-courses/JS-Basics-Practical-IBM-Labs.gitThis creates a folder with the repository's files and history. In a cloned repository, git pull brings the latest changes.
The Source Control view (Ctrl+Shift+G) does the same without commands: it lists the changed files, stages them with +, commits with the message box, and pushes / pulls with Sync Changes. Publish Branch creates the GitHub repository and pushes in one step. Use whichever you like - the commands are good to know, because every tutorial and every error message uses them.
git pull before each session. You only read it.git clone https://github.com/ivapopova-courses/JS-Basics-Practical-IBM-Homework.git
cd JS-Basics-Practical-IBM-Homework
git remote rename origin upstream # the course repository: new tasks come from here
git remote add origin https://github.com/<your-user>/<your-repo>.git
git push -u origin main # your copy: your solutions go here
# before each session
git pull --no-rebase --no-edit upstream mainBranches, merging, conflicts and the pull-request workflow come in session 10.
JavaScript is a programming language that started in web browsers and now runs almost everywhere.
On a web page, the three languages share the work:
Some characteristics:
Java and JavaScript
The names are similar for marketing reasons only. Java and JavaScript are as related as car and carpet.
| Where | Examples |
|---|---|
| browsers | every interactive web page and web app |
| servers and tools | Node.js: web servers, command-line tools, build tools |
| desktop apps | apps built with Electron (VSCode itself is one) |
| mobile apps | React Native and similar frameworks |
| inside other programs | rule engines, databases, automation tools - a host program runs small scripts written by its users |
Your check rules are the last kind: a rule engine runs your JavaScript for every report. In the browser, JavaScript changes pages, reacts to the user, draws graphics, plays media, uses maps and many other APIs (Application Programming Interfaces). In this course we use only the language itself and Node.js - no web pages.
| Year | What happened |
|---|---|
| 1995 | Brendan Eich creates the first version in 10 days, for the Netscape Navigator browser. Its names: Mocha, LiveScript, then JavaScript. |
| 1997 | The language is standardised by Ecma International as ECMAScript (standard ECMA-262). "ECMAScript" is the language standard; "JavaScript" is what everyone calls it. |
| early 2000s | Douglas Crockford popularises JSON (JavaScript Object Notation) - the data format of your reports. |
| 2005 | "Ajax": pages load data without reloading. Libraries like jQuery follow. |
| 2008 | Google releases the fast V8 engine with its Chrome browser. |
| 2009 | Node.js (built on V8) brings JavaScript to servers. ES5 improves the language. |
| 2012 | Microsoft releases TypeScript: JavaScript with types. |
| 2015 | ES6 / ES2015 - the biggest update: let / const, arrow functions, classes, modules. Since then a new version comes every year: ES2016, ES2017, ... |
| today | The committee TC39 develops the language in the open (proposals on GitHub). Optional chaining ?. came in ES2020; a new edition is published every June. |
Why this matters to you: your rule engine supports some version of ECMAScript. Code written for a newer version may not run there. The lectures mark features newer than ES2020 with a short note, so that you can check them.
The fastest way: press Run under any example. The code runs in your browser, and what console.log prints appears under the example.
console.log("Hello from JavaScript!");
console.log(2 + 3);
console.log("The model is " + doc.overview.model);console.log(...) prints its value - our main tool to see what a program does. doc is the example JSON document; it is ready in every example on this site.
The whole document, with a map of its parts, is on the page The example JSON document.
Every browser has developer tools with a console: press F12 (or Ctrl+Shift+I, macOS Cmd+Option+I) and open the Console tab. Type JavaScript and press Enter:
console.log(2 + 3)A web page includes JavaScript with the <script> element - the code itself, or a file with src:
<script>
    console.log("JS welcomes you!");
</script>

<script src="myFirstScript.js"></script>src, the code between the tags is ignored.<script> elements, in <head> or <body>.<body>, or add defer to a script in <head> (<script src="app.js" defer></script>), so that the page shows first.This is how you run the practice tasks, and how you will test rules locally (session 9). Create a file hello.js:
console.log("Hello from Node.js!");
console.log(process.version);    // the Node.js version
and run it from the terminal, in the folder of the file:
node hello.jsBefore the cursor, the terminal always shows the prompt. It ends with the current folder: a command works on the files of this folder, so node hello.js works only in the folder of hello.js. Look at the prompt before you press Enter - most "file not found" errors come from a command typed in the wrong folder.
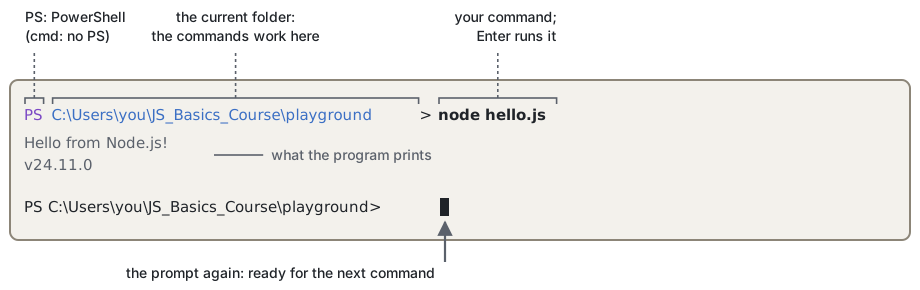
In VSCode: open the folder, open the terminal (Ctrl+`), type node hello.js. (A .vscode/tasks.json file and Ctrl+Shift+B can do the same - the terminal is simpler.) VSCode can also run and debug a file with Run > Run Without Debugging (Ctrl+F5).
node without a file starts an interactive console (a REPL): type JavaScript, see the result; .exit or Ctrl+C twice to leave.
The processor understands only machine code - very simple instructions in binary. Every program in a "human" language must be translated first. There are two classic ways:
Modern JavaScript engines combine both: they start running the code quickly, watch which parts run often, and compile those "hot" parts into fast machine code while the program runs (just-in-time, JIT, compilation).
The engine is the program that runs JavaScript: V8 (Chrome, Node.js, and many other programs), SpiderMonkey (Firefox), JavaScriptCore (Safari). Roughly:
let, x, =, 5);The engine knows only the language. Everything else comes from the environment that hosts it: the browser gives document and alert, Node.js gives process and files, and your rule engine gives emit and the doc of each report. console is given by almost every environment.
Animation
How JavaScript runs your code:1. Translators, 2. Tokens, 3. AST, 4. Two phases, 5. Engine and environment, 6. Bytecode (advanced), 7. Hot code (advanced)
A JavaScript program is a sequence of statements - instructions, run one after the other, from top to bottom. Conditions, loops and functions (sessions 3-5) change that order.
let answer = 42;, console.log(answer);.42, answer, 2 + 3, doc.overview.model. Expressions are the parts statements are built from.;.{ } is a block.// starts a comment: text for people, ignored by JavaScript.Compared with a natural language:
| A language like English | JavaScript |
|---|---|
| a book, a story | a program, a script |
| a paragraph | a block { ... } |
| a sentence | a statement |
| a word | a token |
// this is a comment - JavaScript does not run it

// declares the variable answer
let answer;

// stores the number 42 in answer
answer = 42;

// prints the value of answer to the console
console.log(answer);

// a block: statements that belong together
{
    const model = doc.overview.model;
    console.log("The model is", model);
}Browser examples often use alert("Welcome") and document.body.style.backgroundColor = "red" - these work only in a browser (alert and document come from the browser, not from the language). In this site they would show a message box and colour the page; in Node.js and in a rule engine they do not exist.
Animation
How an expression is evaluated: 6. Statement vs expression (advanced)
A variable is like a label on a box: the box holds a value, and the label is the name you use to reach it. More exactly, a variable is a name for a place in memory (RAM) that holds a value the program needs. You choose the name, following a few rules (lecture 2). Once the variable exists, you can store values in it and read them back.
let x = 1;
let y = 2;
let z;          // created, but no value stored yet

console.log(x, y, z);   // 1 2 undefined
x = x + y;              // read x and y, store the result in x
console.log(x); // 3Animation
Variables in memory: 1. Declaring and assigning
On the report - variables give names to the values a rule reads:
let model = doc.overview.model;
let version = doc.overview.version;
console.log(model, version); // XR-220 4.2.1.7How to declare variables (let, const), how to name them, and what types of values they hold is the start of lecture 2.
In class, step by step:
node -v and git -v in a terminal; set user.name and user.email.JS_Basics_Course/playground/, open it in VSCode, create hello.js with two console.log lines, and run it with node hello.js.git init, git add ., git commit -m "Add hello.js". Look at git status and git log --oneline before and after.git remote add origin ..., and git push -u origin main. Refresh the page on GitHub.hello.js, commit, push again - once with commands, once with the Source Control view of VSCode.| Topic | Remember |
|---|---|
| The course | Rules over JSON reports; 10 sessions; the site, Homework and Labs repositories; a helper library as the project |
| Tools | Node.js LTS (node -v), VSCode, Git (git -v), a GitHub account |
| VSCode | Open a folder; Ctrl+Shift+P Command Palette; Ctrl+` terminal; Source Control view |
| Git | Working directory -> git add -> staging -> git commit -> repository; status, log, .gitignore |
| GitHub | git remote add origin URL, git push -u origin main; git clone; git pull |
| JavaScript | The language of the web, also in Node.js and inside other programs (rule engines); standard: ECMAScript, a new version every year |
| Running it | The Run buttons of this site; the browser console (F12); node file.js in the terminal |
| How it runs | Engine (V8): tokens -> AST -> bytecode -> hot code; the environment gives console, document, emit |
| Structure | Statements run top to bottom, end with ;; expressions give values; blocks { }; comments // |
| Variable | A name for a value in memory; details in lecture 2 |
hello.js in a repository of your own on GitHub, Labs cloned, Homework set up with upstream and origin (see the Homework README).Next session: variables, types and operators - let and const, numbers and strings, and turning the strings of a report into numbers.