English
Appearance
Most code examples have a bar under them:
Ctrl+Enter).Try it:
course = "Python for Data Analysts"
print("Welcome to", course)
len(course)The first Run on a page loads Python into the browser and takes a few seconds; after that it is fast. Examples that use pandas or NumPy load them the first time too.
Every example runs on its own: a variable from one example does not exist in the next one. The sample data files are available in every example, in the folder data/:
import pandas as pd

loans = pd.read_csv("data/loans.csv")
loans.head()The sample data is made up
All clients, loans and values in it are invented; only the shape is typical of the data of a bank. What is in each file: Sample data.
The tasks and the final project run on your own computer. The setup on this page is for Windows, with the Command Prompt (cmd) as the terminal. You need:
| Program | Version | What for |
|---|---|---|
| Python | 3.12 or newer, 64-bit | the language |
| Visual Studio Code | latest | the editor, with the extensions below |
| Git | latest | versions of your code; the tasks come with it |
| GitHub account | free | your own copy of the tasks |
Any Python from 3.12 on works: if you already have one, keep it. To install Python, open the Windows downloads page, find the first version under Stable Releases that has a Download Windows installer (64-bit) link, and take it - not the "Python install manager". On the first screen of the installer, tick Add python.exe to PATH. Check the tools in the Command Prompt (in VS Code: Terminal > New Terminal, see VS Code and the terminal):
py --version
git --version
You see Python 3.12.x or a newer version, and git version 2.x.x.
The libraries (pandas, NumPy, ...) are installed into a virtual environment in the Homework folder - see step 9 below.
| Extension | By | What for | Needed |
|---|---|---|---|
| Python | Microsoft | run and debug Python; it installs Pylance, Python Debugger and Python Environments too | required |
| Jupyter | Microsoft | notebooks inside VS Code | required |
| Data Wrangler | Microsoft | see a DataFrame or a CSV file as a table: sort, filter, statistics per column; it writes the pandas code for the cleaning steps you click | lectures 14 - 16 |
| Rainbow CSV | mechatroner | each column of a CSV file in its own colour; SQL-like queries on a CSV file | from lecture 9 |
| SQLite Viewer | Florian Klampfer | open a SQLite .db file and look at its tables | lecture 13 |
| Spreadsheet Viewer | MESCIUS | open .xlsx files in VS Code (its old name is Excel Viewer) | lectures 9, 14, 16 |
Install them all at once.
.vscode and put the file into it (the file must be .vscode/extensions.json).Missed the question? Open the Extensions view (Ctrl+Shift+X) and type @recommended in the search box. Under Workspace Recommendations, hover over the header and click the cloud icon (Install Workspace Recommended Extensions).
The Homework folder (step 6 below) already has this file, so there VS Code asks by itself. You can also create the file yourself and paste this content into it:
{
  "recommendations": [
    "ms-python.python",
    "ms-toolsai.jupyter",
    "ms-toolsai.datawrangler",
    "mechatroner.rainbow-csv",
    "qwtel.sqlite-viewer",
    "GrapeCity.gc-excelviewer"
  ]
}
One at a time: search for the name in the Extensions view and click Install.
On a company laptop
Some companies block the extension Marketplace or allow only approved extensions. If Install does not work, ask your IT for the extensions in the table.
The practice tasks and the homework are in the Homework repository: https://github.com/ivapopova-courses/Python-Data-Analysts-UniCredit-Homework
Each lecture has a folder there (01-intro-syntax-types/, ...) with two kinds of tasks:
practice/task1-....py, ...): short exercises, one topic each, in the order of the lecture. We start them in class if time allows. Finish the rest at home if you can - later tasks and the final project reuse them.homework.py): one larger task that puts the topics of the lecture together. Do it before the next session - we go through it together at the start.This part of the page shows, step by step, how to get the tasks to your computer, run them and save your solutions. It is written for Windows, and for people who have not used a command line before. The setup is done once and takes about 30 minutes. After that, each session needs a few clicks and a few short commands.
The idea. A repository (or repo) is a project folder whose history Git keeps. In this course you work with three copies of the Homework repository:
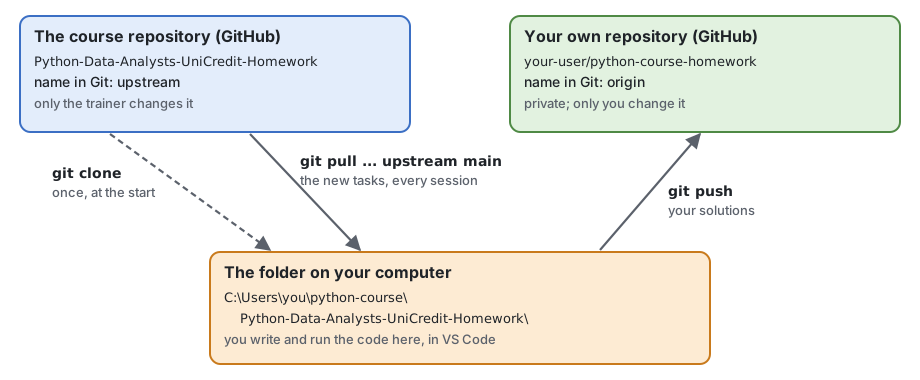
Click a diagram (on a phone: tap it) to see it bigger, over the whole page.
upstream.origin.Git is the program on your computer that keeps the versions of the files. GitHub is the website that keeps the repositories online.
Check these four things first:
You do everything in VS Code. This is the window with the Homework folder open:
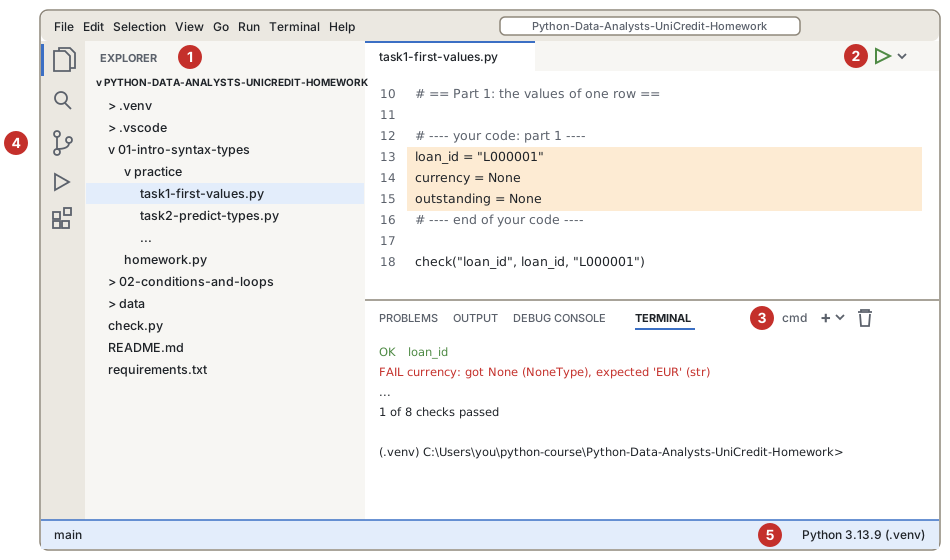
PYTHON-DATA-ANALYSTS-UNICREDIT-HOMEWORK when you work on the tasks. Click a file to open it..venv (step 10 below).The terminal is a window where you type a command and the computer answers with text. It is a bit like the SAS log, but you submit one line at a time and the answer comes right under it. Before the cursor, the terminal always shows the prompt:
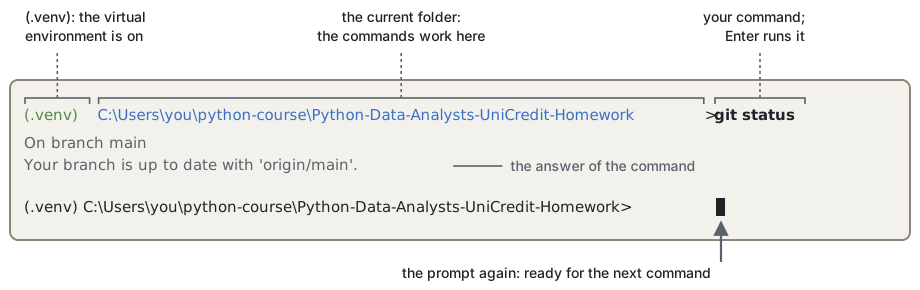
The current folder in the prompt is important: a command works on the files of this folder. Most problems come from a command typed in the wrong folder - so look at the prompt before you press Enter. (you stands for your Windows user name.)
How to run a command from this page:
Ctrl+V (or a right-click).Enter and wait until the prompt comes back. Some commands work for a few seconds, an installation for a few minutes. Do not type anything in the meantime.error or fatal: stop and find it in If something goes wrong.Good to know:
Up (the arrow key) brings back the last command. Change it with Left / Right and run it again with Enter.Ctrl+C stops a command that hangs; cls clears the screen.Use the Command Prompt (cmd). On Windows, the terminal of VS Code is PowerShell by default. The commands on this page are for the Command Prompt, as in the setup before the course; in PowerShell, a company laptop may block step 9. Make the Command Prompt the default once:
Ctrl+Shift+P. A search box opens at the top of the window (the Command Palette).default profile and choose Terminal: Select Default Profile.You see: the prompt looks like C:\Users\you>, without PS at the start (PS means PowerShell).
You do this only once, at the start of the course. Go step by step, and check the You see of each step before you go on. At the end, your course folder looks like this:
C:\Users\you\python-course\
    Python-Data-Analysts-UniCredit-Homework\
        .venv\
        01-intro-syntax-types\
            practice\
            homework.py
        02-conditions-and-loops\
        data\
        check.py
        requirements.txt
    Python-Data-Analysts-UniCredit-Labs\
python-course - the course folder (step 1).Python-Data-Analysts-UniCredit-Homework - the tasks (step 5). Open this folder in VS Code when you work on them..venv - Python with pandas and the other libraries (step 9).practice and homework.py - the practice tasks and the homework of each lecture. data - the sample data. check.py prints OK / FAIL / TODO: do not change it.Python-Data-Analysts-UniCredit-Labs - the code from the lessons (see Code from the lessons).%USERPROFILE% and press Enter. This is your user folder, C:\Users\you.python-course and press Enter.You see: the prompt ends with the course folder:
C:\Users\you\python-course>Why not the Desktop or Documents?
On a company laptop, the Desktop and Documents are often kept in OneDrive. OneDrive then tries to sync the thousands of small files of the virtual environment (step 9): that is slow and can lock the files. A folder right in your user folder is not synced. Do you already have a folder for the course from the setup before it? Use it, if it is not in OneDrive.
Run these two commands, one at a time:
py --versionYou see: Python 3.12. (or higher) and a number.
git --versionYou see: git version 2. and more numbers.
... is not recognized as an internal or external command? See If something goes wrong.
Git writes your name and email into every version you save. Copy the first command and paste it into the terminal. Before you press Enter, change the text between the quotes to your name: move with the arrow keys, delete with Backspace.
git config --global user.name "Your Name"The same for your email. Use the email of your GitHub account:
git config --global user.email "you@example.com"You see: nothing. Here, no answer is a good answer. Check both:
git config --global --listYou see: your name in the line user.name=... and your email in the line user.email=.... Steps 2 and 3 are once per computer.
In the browser:
python-course-homework (or another name you like)..gitignore, no license. The repository must be empty - otherwise step 8 fails.https://github.com/your-user/python-course-homework.git. Leave this page open in the browser: you copy the address from it in step 7.In the terminal - the prompt ends with \python-course>:
git clone https://github.com/ivapopova-courses/Python-Data-Analysts-UniCredit-Homework.gitThe first time, a window asks you to sign in to GitHub. Choose Sign in with your browser, sign in in the browser and allow the access (Authorize). Windows remembers it: Git does not ask again.
You see: Cloning into 'Python-Data-Analysts-UniCredit-Homework'..., a few lines with 100%, and the prompt again. The new folder Python-Data-Analysts-UniCredit-Homework appears in the Explorer.
python-course, select Python-Data-Analysts-UniCredit-Homework (one click) and click Select Folder.You see: the Explorer shows PYTHON-DATA-ANALYSTS-UNICREDIT-HOMEWORK at the top, and the prompt ends with the Homework folder:
C:\Users\you\python-course\Python-Data-Analysts-UniCredit-Homework>From now on, always open this folder when you work on the tasks. VS Code opens the last folder by itself; if not, File > Open Recent.
Now the folder knows only the course repository, under the name origin. Rename it to upstream:
git remote rename origin upstreamYou see: nothing.
Now add your own repository as origin. On the GitHub page of step 4, copy your address with its copy button (closed the page? Open your repository on GitHub: it shows the same page). In the terminal, type git remote add origin (with a space at the end), paste the address with Ctrl+V, and press Enter. The whole line looks like this:
git remote add origin https://github.com/your-user/python-course-homework.gitCheck:
git remote -vYou see four lines: origin with your address, upstream with the address of the course:
origin    https://github.com/your-user/python-course-homework.git (fetch)
origin    https://github.com/your-user/python-course-homework.git (push)
upstream  https://github.com/ivapopova-courses/Python-Data-Analysts-UniCredit-Homework.git (fetch)
upstream https://github.com/ivapopova-courses/Python-Data-Analysts-UniCredit-Homework.git (push)git push -u origin mainYou see: a few lines with 100%, and at the end:
branch 'main' set up to track 'origin/main'.Refresh the page of your repository on GitHub: the folders of the tasks are there.
The tasks of the later lectures need pandas and other libraries. They go into a virtual environment: the folder .venv in the Homework folder, with its own Python and its own libraries (lecture 1 explains it). Four commands, one at a time:
py -m venv .venvYou see: no answer, but after a few seconds the folder .venv appears in the Explorer. If VS Code asks whether to use the new environment for this folder, click Yes.
.venv\Scripts\activateYou see: the prompt now starts with (.venv). The next two commands install into this environment.
python -m pip install --upgrade pippip install -r requirements.txtThis takes a few minutes. You see many lines; the last one starts with Successfully installed and lists the libraries (pandas, numpy, ...). A WARNING or a [notice] line is fine; an ERROR is not - see If something goes wrong.
The folder .venv stays only on this computer: Git does not save it (it is listed in .gitignore).
Ctrl+Shift+P, type select interpreter and choose Python: Select Interpreter..venv (.\.venv\Scripts\python.exe).You see: the status bar at the bottom of the window (5 in the picture) shows the version of Python and .venv. From now on VS Code runs the tasks with this Python, and a new terminal starts with (.venv) by itself.
01-intro-syntax-types, then practice, and click task1-first-values.py.Ctrl+Shift+B.You see, in the terminal:
-- Part 1: the values of one row -------------------------------
  TODO   loan_id
  TODO   currency
...
================================================================
Part 1: the values of one row  not started
Part 2: is the loan late?      not started
Part 3: a summary line         not started

0 of 8 checks passed.  Failed: 0.  Not started: 8.
TODO is right here: you have not written any code yet. The setup is done.
Every time:
PYTHON-DATA-ANALYSTS-UNICREDIT-HOMEWORK at the top (if not: File > Open Recent).02-conditions-and-loops, practice, task1-predict-logic.py.# == Part 1: ... == (in the newer tasks with a line # =====... above it). Read the description of the first part (the # comments right after its heading). Write your code between the lines # ---- your code ... ---- and # ---- end of your code ----. Change nothing else in the file.Ctrl+Shift+B, or the triangle at the top right (Run Python File, 2 in the picture). Both save the file first.-- Part N: ... --- starts the checks of each part. Under a FAIL line you see what your code gave (got:) and what the check expects (expected:). At the end you see one line per part and a line like 5 of 8 checks passed. Fix your code and run the file again.What the colours mean
OK (green) - your code gives the expected value.FAIL (red) - it does not. Read got: and expected: under it.TODO (yellow) - you have not written any code in this part yet. Not an error: it changes to OK or FAIL when you start the part.WRONG (red, only in predict tasks) - the prediction is not right.The summary at the end uses the same colours: a green part is done, a yellow one is not started, a red one has checks to fix.
Predict tasks
In a predict task (task1-predict-logic.py) you do not write code. You replace each "?" with the value you think the expression gives, for example True, 3 or "EUR", in the right type. The file prints OK, WRONG or TODO (not answered yet) for each prediction, but never the real result, so run it as often as you like. For a WRONG, read the lecture section again and change your prediction. Still WRONG after that? Write to the trainer, and we will discuss it in class.
Notebooks
Some lectures also have an optional notebook, for example 01-intro-syntax-types/notebook.ipynb: short extra tasks on the same topics. Open it, choose the .venv kernel (Select Kernel > Python Environments), and run the cells from the top with Shift+Enter, the Setup cell first. Each part has a cell for your code (replace each None) and a check cell that prints OK, FAIL or TODO. The last cell counts the OK checks. Before you trust it: Restart the kernel and Run All.
Another way to run a task: in the terminal, with (.venv) at the start of the prompt, type python and the path of the file:
python 02-conditions-and-loops\practice\task1-predict-logic.pyYou do not have to type the path: right-click the file in the Explorer > Copy Relative Path, then type python in the terminal (with a space) and paste with Ctrl+V.
Save your solutions in your own repository at the end of each working day, and always before a session. Three commands, in the terminal of the Homework folder:
git add .Chooses all changed files for the next version. Mind the dot at the end.
git commit -m "Session 2 practice"Saves a version on your computer, with a short message. Change the text between the quotes as you like.
git pushSends the new versions to your repository on GitHub.
You see: after git push, a few lines and at the end main -> main. Refresh your repository on GitHub: your changes are there. If git commit says nothing to commit, working tree clean, there is nothing new to save: did you save the file (Ctrl+S)?
The same with buttons
Open Source Control (4 in the picture, or Ctrl+Shift+G). Type a message in the box at the top and click Commit. If VS Code asks Would you like to stage all your changes and commit them directly?, click Yes. Then click Sync Changes (and OK, if VS Code asks).
The trainer adds the folder of each lecture on the morning of its session. To get it:
Save your work first: the three commands of Save your work.
Get the new tasks from the course repository:
git pull --no-rebase --no-edit upstream mainSend them to your own repository too:
git pushYou see: after the pull, a line like Merge made by the 'ort' strategy. (or Fast-forward) and the list of the new files. The new folder, for example 03-lists-tuples-sets, appears in the Explorer. Your own files do not change.
The parts of the pull command: upstream main - from the course repository; --no-rebase - join the new tasks with your work; --no-edit - do not ask for a message. Without them, Git stops with an error or opens an editor.
Read the last lines in the terminal: the error is usually there. Find it below. Still stuck? Write to the trainer: the step, the command, and a screenshot of the terminal (Win+Shift+S takes a screenshot of a part of the screen).
'git' is not recognized as an internal or external command - Git is not installed, or VS Code was open while you installed it. Install Git for Windows with the default settings, then close VS Code completely and start it again.'py' is not recognized as an internal or external command - Python was installed without its launcher py. Use python instead of py (step 9: python -m venv .venv). If python --version does not work either, install Python again, with Add python.exe to PATH ticked (see Set up Python on your computer).PS, or running scripts is disabled on this system after .venv\Scripts\activate - the terminal is PowerShell. Make the Command Prompt the default (VS Code and the terminal), open a new terminal and run the command again.remote: Repository not found. (step 5) - you have no access yet: accept the invitation (Before you start). Already accepted? Then Git is probably signed in with another GitHub account. In the Windows Start menu, open Credential Manager > Windows Credentials, remove the entry git:https://github.com, and run the command again: Git asks you to sign in.fatal: destination path 'Python-Data-Analysts-UniCredit-Homework' already exists (step 5) - you have downloaded it before. Go on with step 6.fatal: not a git repository - the terminal is not in the Homework folder. Open the Homework folder (step 6) and a new terminal: the prompt must end with \Python-Data-Analysts-UniCredit-Homework>.error: remote origin already exists. (step 7) - run git remote -v and compare with step 7. Is origin the address of the course? Run the two commands of step 7 again, in their order. Is origin a wrong address of yours? Type git remote set-url origin (with a space at the end), paste the right address and press Enter.! [rejected] main -> main (fetch first) (step 8) - your repository on GitHub is not empty: it has a README. On GitHub, delete it (in the repository: Settings, at the bottom Delete this repository) and create it again, empty (step 4), with the same name. Then run step 8 again.Author identity unknown (commit) - Git does not know who you are. Do step 3, then run the commit again.ERROR in step 9, with ProxyError, SSLError or CERTIFICATE_VERIFY_FAILED - the company network blocks or checks the connection to pypi.org, the site of the Python libraries. Ask your IT for the pip settings (a proxy or an internal mirror), as for the setup before the course.ModuleNotFoundError: No module named 'pandas' (when you run a task) - the task runs with another Python, not the one in .venv. Do step 10. In the terminal, the prompt must start with (.venv); if it does not, run .venv\Scripts\activate.fatal: Need to specify how to reconcile divergent branches. (pull) - the two options are missing. Use the whole command of Get the new tasks.Your local changes to the following files would be overwritten by merge (pull) - some changes are not saved in a version yet. Do the three commands of Save your work, then pull again.CONFLICT (pull) - rare: the same file was changed in both repositories. Run git merge --abort (everything is as before the pull) and write to the trainer.~, or -- INSERT -- at the bottom) - Git asks for a message in the editor Vim. Press Esc, type :wq and press Enter. Next time, use the commands exactly as on this page (git commit -m "...", git pull --no-rebase --no-edit ...).The code written during the lessons is in the Labs repository: https://github.com/ivapopova-courses/Python-Data-Analysts-UniCredit-Labs
You only download it. Do not write your own code there - use the Homework folder for that.
Once (after you accepted its invitation, see Before you start):
Open the course folder python-course in VS Code (File > Open Folder...), not the Homework folder: the Labs folder must be next to the Homework folder, not inside it.
Terminal > New Terminal. The prompt ends with \python-course>.
Download it:
git clone https://github.com/ivapopova-courses/Python-Data-Analysts-UniCredit-Labs.gitDid it land inside the Homework folder? Close VS Code and move the folder Python-Data-Analysts-UniCredit-Labs one level up, into python-course, in the File Explorer of Windows.
After each lesson: open the Labs folder in VS Code (File > Open Recent), open a terminal and get the new code:
git pullCtrl+K) searches all lectures.Esc to close it.